

Macbook Print Screen Hotkey
If you Googled "How to do Print Screen on a Mac" it means that you recently have switched from Windows to a shiny Mac and have no idea where to find the "Print Screen" button which is present on most keywords designed for Windows. There are some exceptions but almost all Windows keyboards have the "Print screen" button somewhere. Unfortunately, there is no such button on your Mac but it doesn't mean that you can't take a screenshot, you can but the process is a bit more complicated, harder to memorize but is much more flexible when it comes to output and what you are specifically looking to capture in a screenshot.
There are 6 (!) different ways to capture a screenshot on your Mac, 3 different approaches with 2 different outputs for each but personally, I use only two and I call myself a heavy Mac user and I have taken thousands of screenshots in the last year alone that are all published on these WordPress theme collections. I have no idea how many are there but I am sure that there are at least tens of thousands of screenshots all captured using macOS 11 Big Sur, 10.14: Mojave, macOS 10.13: High Sierra, and older versions of macOS.
I originally decided to write this tutorial because dozens of people have asked how I have created all those screenshots on this website and I will leave this blog post as a reference to anyone asking the same question again.
How to Capture Print Screen on a Mac
1. Method
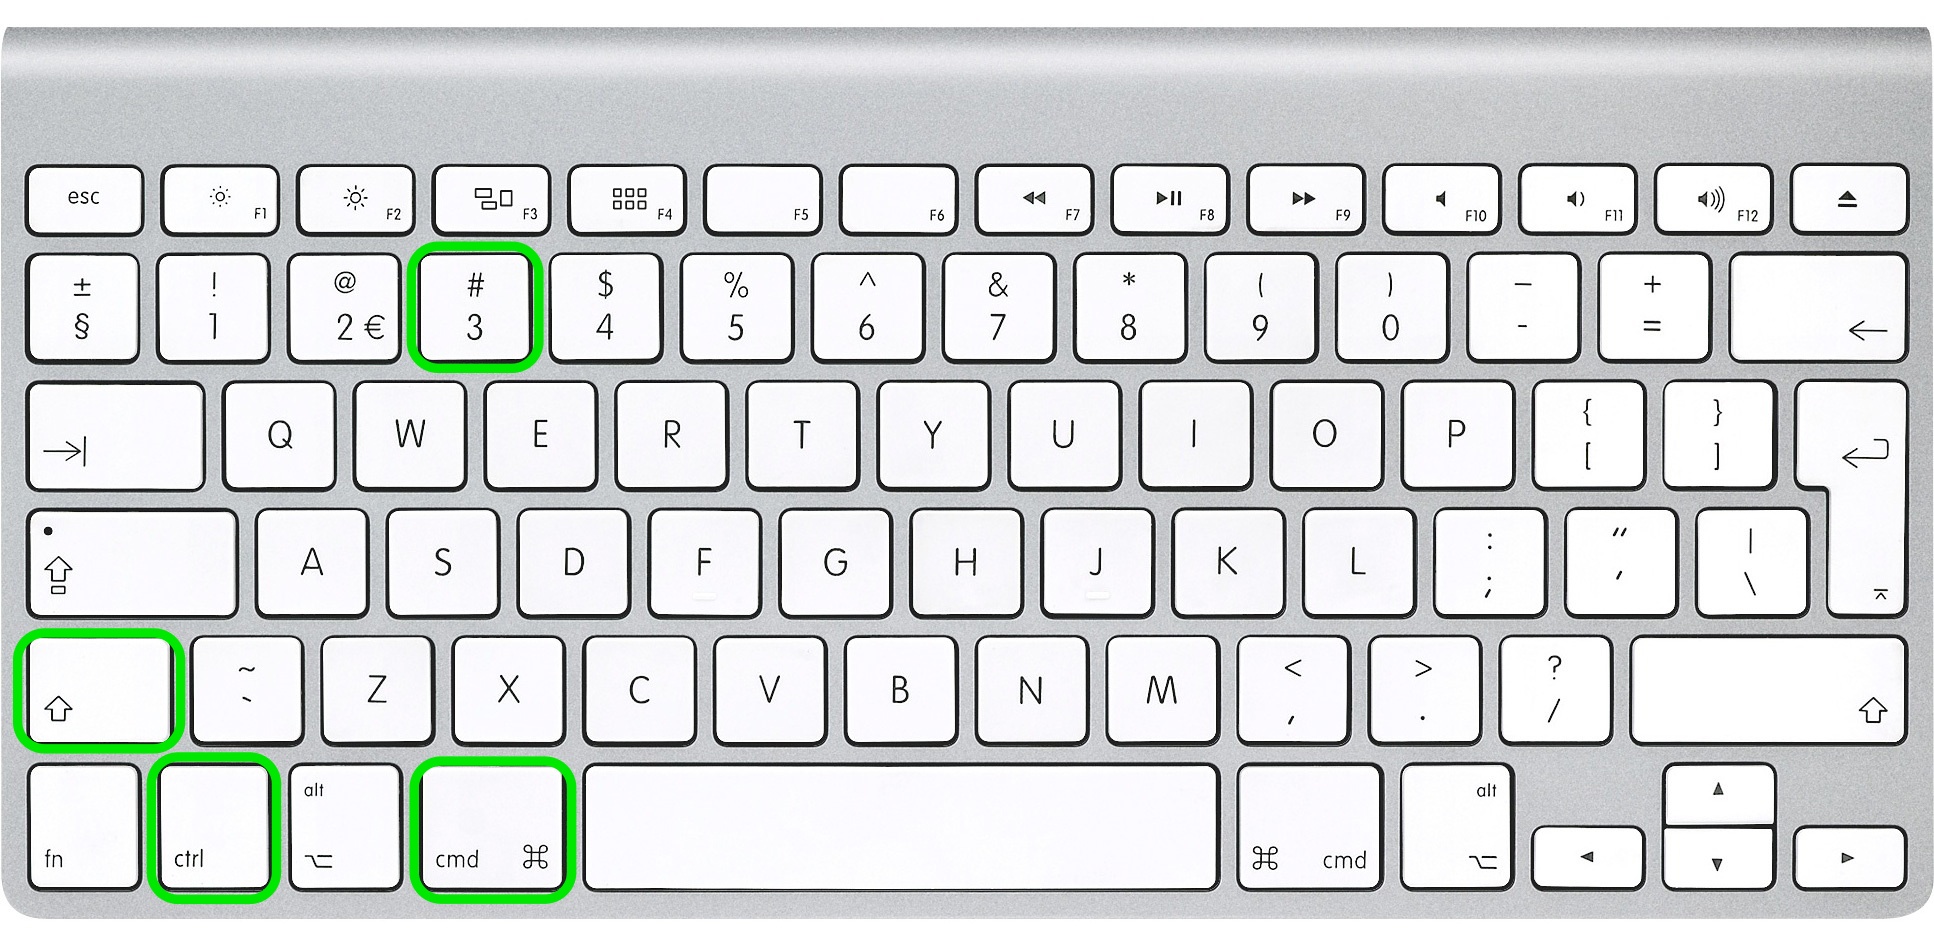
1.1 Capture entire screen area and save it to clipboard
Command ⌘ + Control + Shift + 3
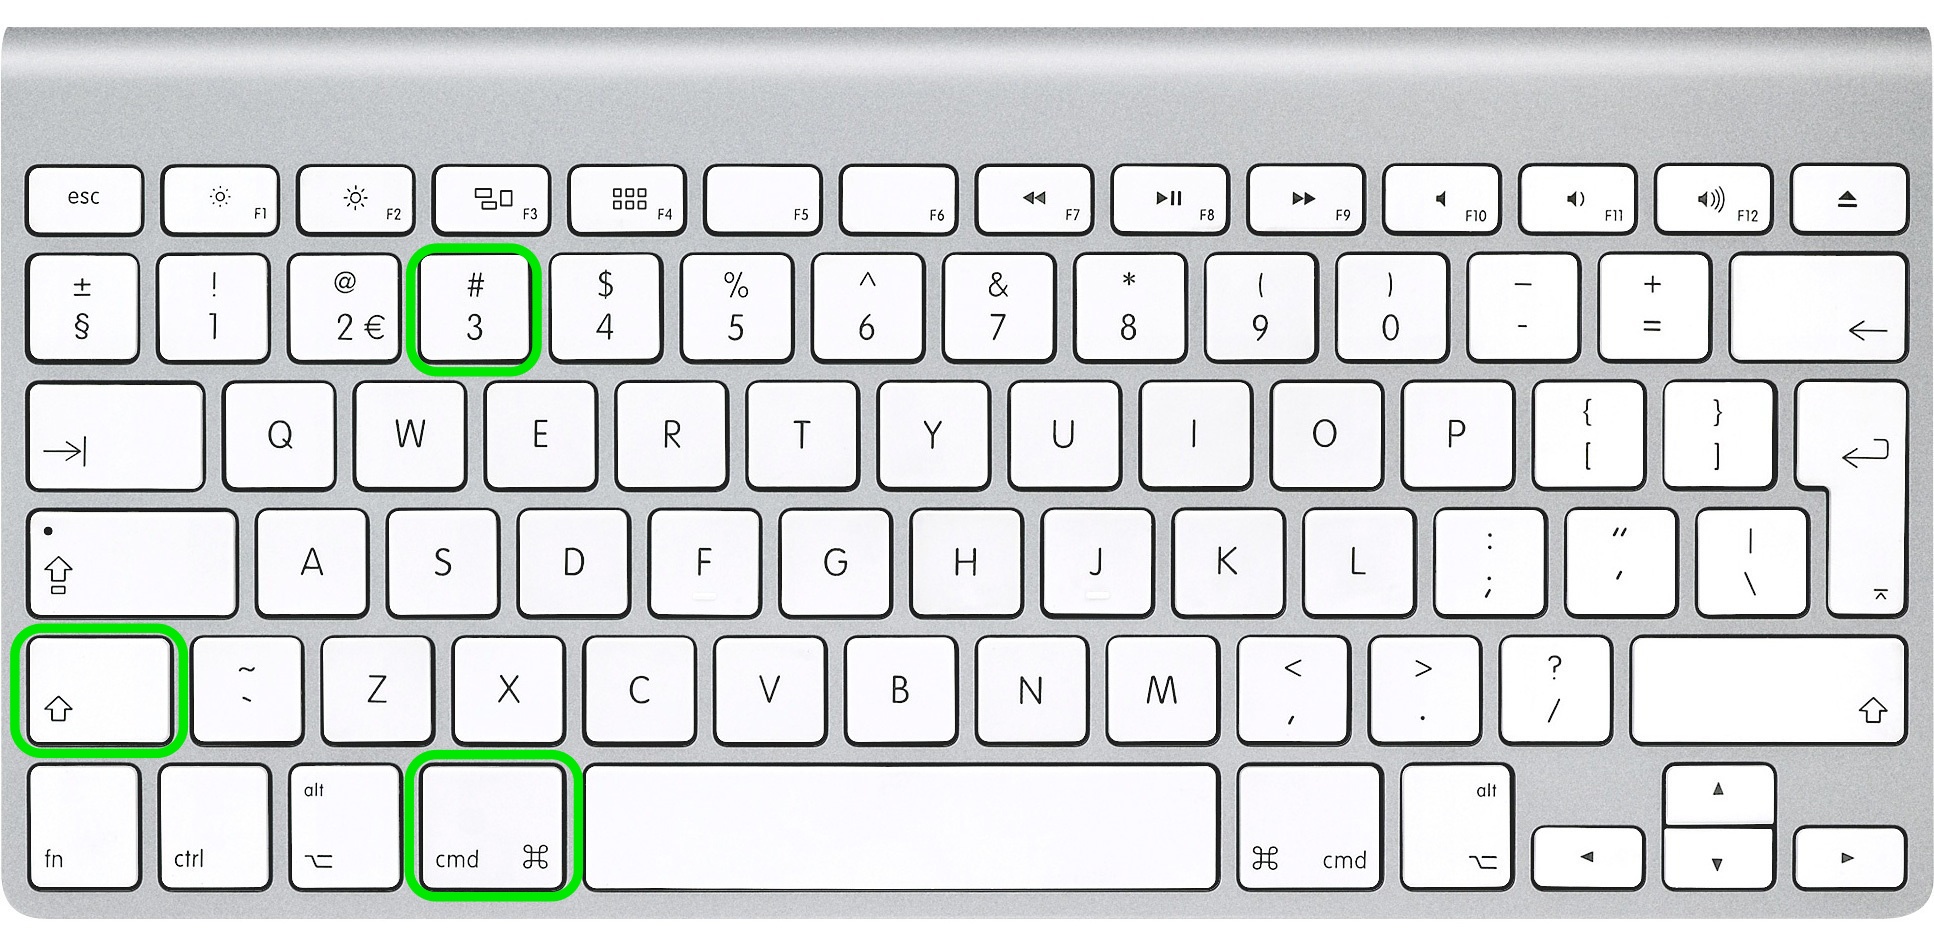
1.2 Capture entire screen area and save it to a file on your desktop
Command ⌘ + Shift + 3
2. Method
This method will help you to capture a selected area of our screen such as the menu bar, opened applications, some part of the desktop, some application window, or anything else. This is a slightly more "advanced" method but it is very useful if you get used to it. Personally, I use this method a lot but you have to repeat this method to memorize and learn how to use it properly on your Mac.
2.1 Capture selected screen area and save it to the clipboard for further use in apps
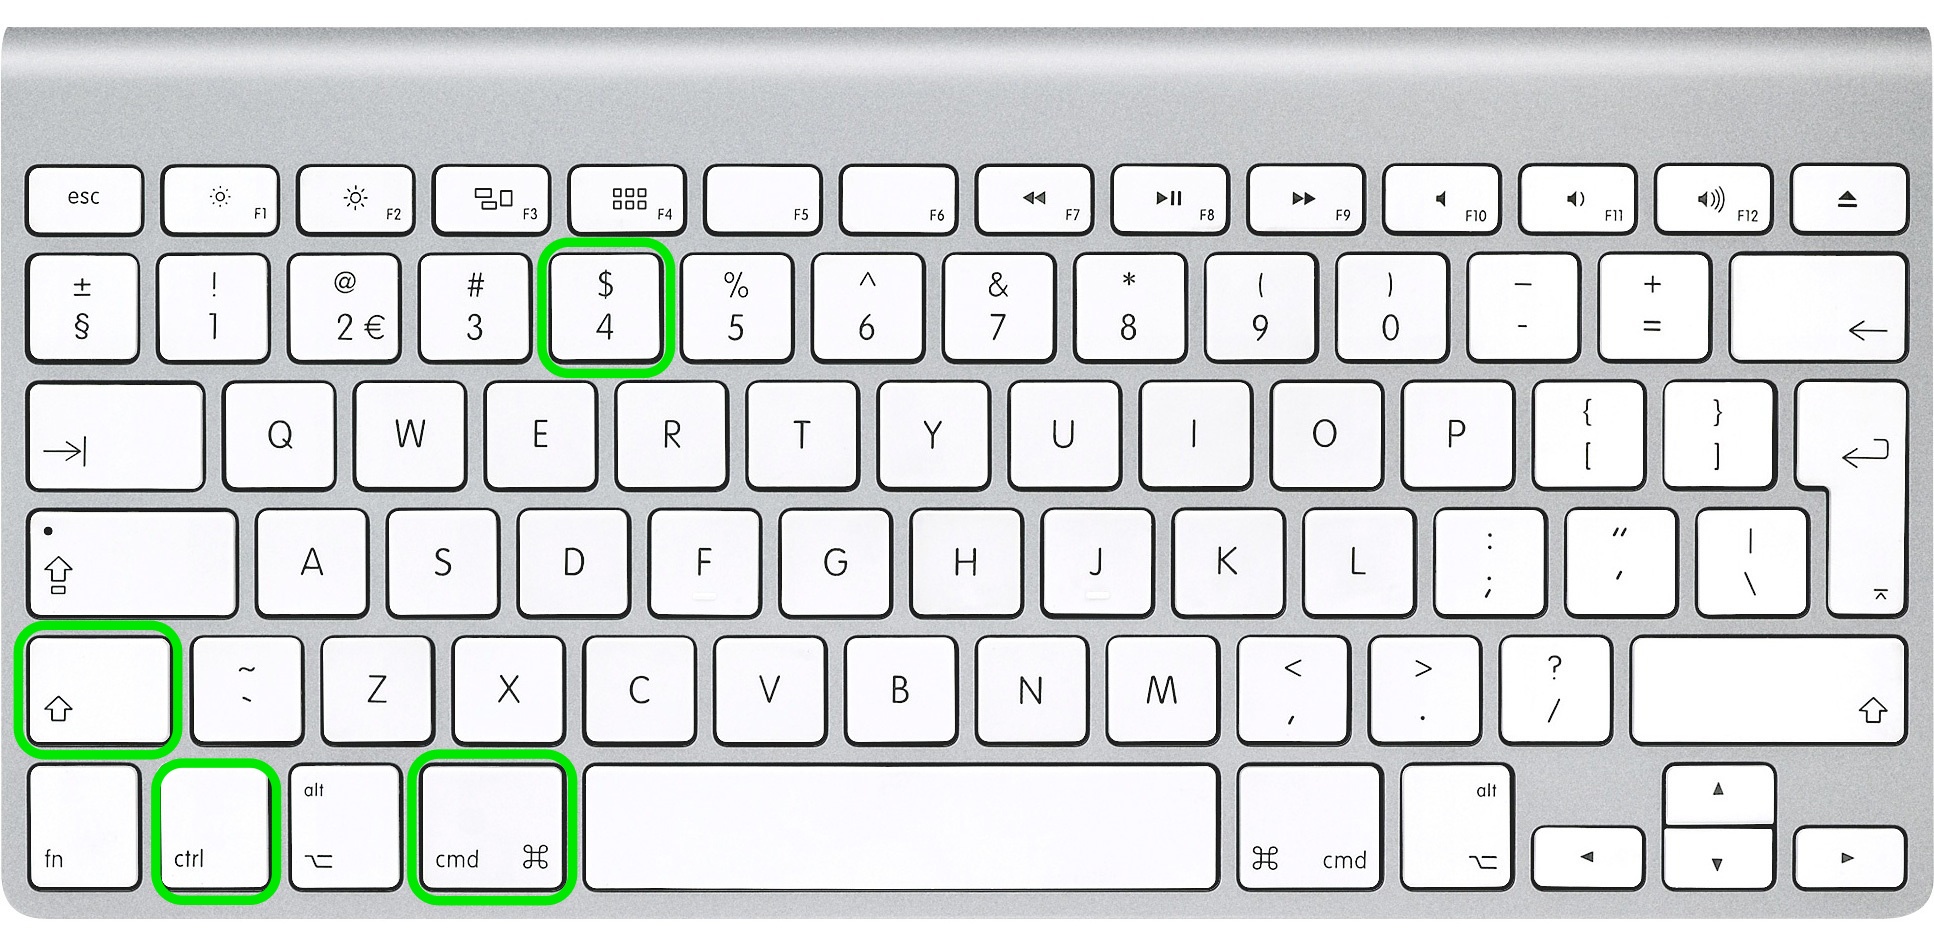
- Press the Command ⌘ + Control + Shift + 4 (for older Mac versions use Apple key ⌘+ Control + Shift + 4) all at the same time.
- You will notice that your mouse cursor changes to "+" with pixel coordinates on the right side
- Now click and drag a box around the section that you want to capture and release the mouse button when you are done
- Now screen capture is saved on the clipboard for further use in apps
2.2 Capture selected screen area and save it to a file on your desktop

- Press the Command ⌘ + Shift + 4 (for older Mac versions use Apple key ⌘ + Shift + 4) all at the same time.
- You will notice that your mouse cursor changes to "+" with pixel coordinates on the right side
- Now click and drag a box around the section that you want to capture and release the mouse button when you are done
- Now screen capture is saved on a PNG file on your desktop (if not otherwise specified)
3. Method
This method will help you to save a print screen of a particular application window such as a web browser, Keynote, Pages, Numbers or other.
3.1 Capture a screenshot of a particular app window and save it to the clipboard
- Command ⌘ + Control + Shift + 4
- You will notice that your mouse cursor changes to "+" with pixel coordinates on the right side
- Now with spacebar (that very wide button on your keyboard )
- Now click on the window you would like to capture in a screenshot
- The screenshot is now saved on your clipboard for further use in apps
3.2 Capture a screenshot of a particular app window and save it to a file on your desktop
- Command ⌘ + Shift + 4
- You will notice that your mouse cursor changes to "+" with pixel coordinates on the right side
- Now with space bar (that wide button on your keyboard )
- Now click on the window you would like to capture in a screenshot
- The screenshot is now saved on a PNG file on your desktop (if not otherwise specified)
As I said, there are 3 methods with 2 different outputs and we have covered them all. If you are having trouble with any of these methods, please let us know in the comments below.
You don't need to memorize all these methods and the best solution here is to find the one or two that you like the most and practice for a while to memorize the theme. If you think that you will definitely forget, make sure to bookmark this page for further reference.
Change the File Format Your Mac Uses to Save Screenshots
If you did try to use some of the above-mentioned methods, you might have noticed that screenshots saved as PNG files. In most cases, it is OK to use this file format because you will get the best image quality but if you are using MacBook Pro Retina or some other 4K monitor you will notice that screenshots can be as large as 5-8MB and that is unacceptable for sending several such files via email.
There is a solution for this as you can change the default file type for screen captures by using a simple terminal command. Every installation of Mac OS X includes the Terminal which you can find in Applications -> Utilities. Or use search to find "Terminal" faster.
Most major image formats are supported by this OS X function including PNG, PDF, GIF, TIFF, and JPG, we'll go with JPG since that is a common type and will output smaller image size than the default PNG.
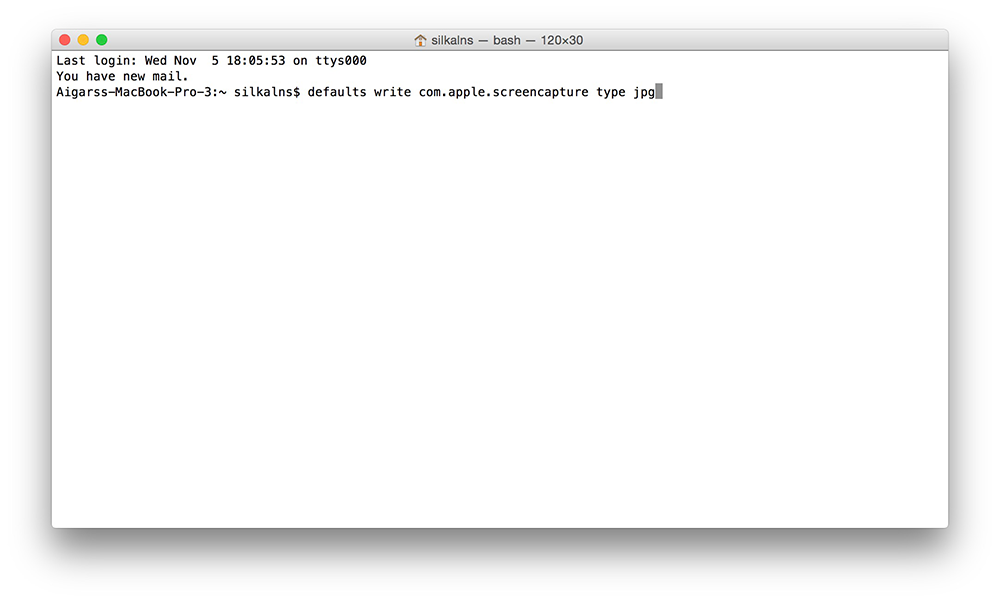
Now that you have Terminal opened copy/paste this command and hit enter (return):
defaults write com.apple.screencapture type jpg
You might have to input your Mac user password, if so, just go ahead and do it.
These changes will take effect after the next restart but you can use this command to make these changes instant. Again copy/paste this command in the Terminal window and hit enter (return).
killall SystemUIServer
Screen captures will now be saved as JPG files. To change back to PNG or to any other file format just run through the process again setting 'png' or other as you type in the first Terminal command.
In case you are looking for the original image of the Mac keyboard we used for this tutorial you can download it from here.
Update:
It has been 8 years since we first published this tutorial and over time it has been viewed by several million users. We are glad that you found it useful and have shared it so many times on social media. This tutorial is still up to date and nothing has changed since.
Since then we have grown a lot and now we offer mockups that might come in handy if you are a designer and want to combine them with screenshots you have taken using the methods above. Since there are too many mockups to list them in a single line we are presenting them in a beautiful list:
- iMac mockups
- iPhone mockups
- iPad mockups
- Apple Watch mockups
- Computer mockups
- Mackbook mockups
Why we even mention mockups here? Because we combine mockups with Mac screenshots to make product presentations such as these.
Disclosure: This page contains external affiliate links that may result in us receiving a commission if you choose to purchase mentioned product. The opinions on this page are our own and we don't receive additional bonus for positive reviews.

Aigars
Frontend web developer and web designer specialized in WordPress theme development. After graduating with BBA he self-though frontend web development. Currently, has over 10 years of experience in mainly CSS, HTML (TailwindCSS, Bootstrap), JavaScript(React, Vue, Angular) and PHP. Obsessed with application performance, user experience and simplicity.
Macbook Print Screen Hotkey
Posted by: barberappencet.blogspot.com
Source: https://colorlib.com/wp/print-screen-mac/
0 Response to "Macbook Print Screen Hotkey"
Post a Comment